Drywall Repair
Professional drywall work is an art form. It is a trade that takes many years of practice to develop the skills necessary to quickly, efficiently, and effectively install, tape, and “mud” drywall into a seamless finished product.
But that is not to say that you cannot repair your own existing drywall to a smooth and professional finish on your own. In fact, in the case of most drywall repairs, it can be very costly to hire a drywall finisher to perform the work.
Most drywall repairs are a multi-step process that requires a short amount of work spread out over several days. This requires multiple visits to your home by the finisher for a small amount of work within each visit.
Suffice it to say, most drywall finishers don’t want this hassle for such a small job, and will likely decline the solicitation for repair or charge more for their trouble.
In the end, a typical able-bodied homeowner is left with the obligation to repair due to cost and an inability to find someone to do the work. Most repairs, if self-performed, can be completed for less than $50 in materials and tool costs.
In order to perform your repair, you must first assess and determine the type and size of the damage you are attempting to repair, as there are various repair methods to use depending on the nature of the damage.
Is your drywall damage a small nail hole or drywall anchor hole? If so, follow these simple steps and tips to repair like a pro:
• Clean the hole and remove paint chips, bulges, rough edges, etc. to ensure a clean mating surface for the drywall putty. You can do this with your putty knife or utility knife.
• Using a pre-mixed painter’s putty (typically dries fast and can be used on multiple surface types) or drywall joint compound (typically dries overnight) layer the putty into the hole smoothing it flush with the existing surface of the wall.
• Allow the putty to dry and then sand using a sanding block to ensure a flush and even surface with the surrounding wall.


Tip: Drywall sanding makes a dusty mess. When sanding a wall, most dust will fall quickly to the floor; however, some dust will become airborne and settle out on around your home if proper provisions are not made to collect the dust.
For a small repair job, a smaller amount of dust will be generated and a wet sanding sponge (available at your local hardware store) can do the trick to keep dust a minimum.
Be careful not to soak your wall too heavily with the sanding sponge and be sure to rinse and wring out the sponge often. Also, using a low dust joint compound can help minimize dusting.
As with all home repair, safety should be your highest priority and the proper PPE (Personal Protective Equipment) should be used.
In this case, a good pair of goggles and a respirator will keep the dust out of your eyes, nose, and mouth. See additional dust tips below for larger sanding jobs.
• Repeat step 3 and 4, if necessary, to ensure a completely filled and flush finish.
• Prime and paint your completed repair.
Is your drywall damage of medium size (the size of your fist)? If so, follow these simple steps and tips to repair like a pro:
• Clean the hole and surrounding edges to remove excess, loose drywall and sand the immediate area surrounding the hole to slightly roughen glossy paint. Remove any excess dust and ensure a clean, smooth surface.
• Using a mesh self-adhesive patch (available at your local hardware store) sized at least an inch larger than the hole size in all directions, firmly press the patch over the hole and ensure good adhesion on the surrounding surface.
• Layer drywall joint compound over the patch and feather the compound out at the edges to the surface of the existing wall. Doing this effectively is the trick to ensuring a repair is not a noticeable eye-sore once completed. Feathering of the compound to the edges allows “blending” in of the ever-so-slightly raised portion of patch material placed over the hole.
Tip: Be sure not to go overboard with joint compound in the first coat, as the key to making the patch unnoticeable is a thin transition from existing wall to patch to existing wall with minimal “bump”.
• Allow joint compound to dry and sand smooth ensuring, again, a smooth transition from patch to wall. It is likely that your sanding will uncover the mesh patch below. This is to be expected if you minimized your first layer of compound.
• Repeat steps 3 and 4, layering in compound and feathering/blending the edges until the patch mesh is undetectable and a smooth, thin transition exists between the patch and the surrounding wall.
• Prime and paint your completed repair.
Is your drywall damage of large size (larger than your fist)? If so, follow these simple steps and tips to repair like a pro:
• If your damage is larger than 4 inches or so, it is best to repair with a new piece of drywall sized to fit within a freshly cut, larger rectangular opening. This may sound counterintuitive to cut more drywall out around your existing hole, but in the long run, you’ll have a much better-finished product. First, you must determine the existing drywall’s thickness. Once this is determined, you can typically pick up a small square drywall board of the same thickness from your local hardware store (~2’ x 2’). This allows you to forego purchasing and handling a whole 4’x8’ sheet of drywall for a small patch. Pick up some scrap wood strips (~1/2” thick x ~2” wide) from the lumber department to use as furring strips in your repair. These scraps should come free.
• Investigate behind the existing drywall near the area needing repair for signs of any obstruction such as a wall stud (if a wall repair), ceiling joist (if a ceiling repair), electrical wiring, water lines, etc. and determine the extent of which these obstructions will interfere with cutting a larger hole. If such an obstruction exists, take caution when cutting and be sure to remove any electrical current from nearby wiring by opening the breaker at your electrical panel.
• Using a drywall hand-saw or sharp utility knife, cut a rectangular portion of new drywall slightly larger than the existing hole – at least 1” in every direction. Then, place this board over the damaged drywall and trace the perimeter.
• Using a drywall hand-saw, cut out the existing drywall along the traced perimeter.
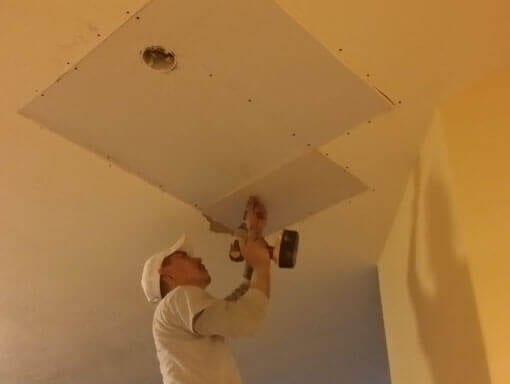
• In order to mount the new drywall within the opening, cut two furring strips 3 to 4 inches larger in length than your new opening. Center the furring strips behind the existing drywall at opposite ends of the opening and screw in place using drywall screws through the existing drywall. Be careful not to over-drill. This can be ensured by using a drywall screw setter bit on your drill.
• Place the drywall patch piece in the opening and secure to the furring strips using drywall screws.
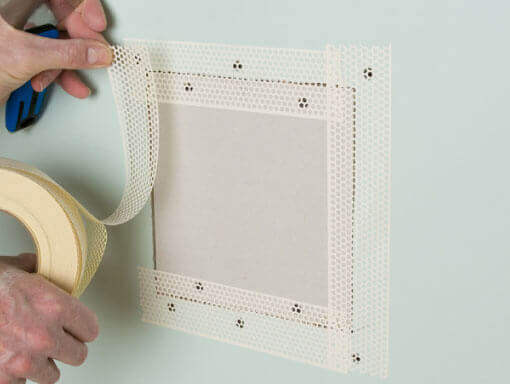
• Using a self-adhesive mesh tape, center the tape over each of the four joints and press firmly into place. If your tape does not adhere well, a thin coating of drywall mud at the joints can be placed prior to taping.
• Layer drywall joint compound over the entire patch and feather the compound out at the edges to the surface of the existing wall.
• Allow joint compound to dry and sand smooth ensuring a smooth transition from patch to the wall. It is likely that your sanding will uncover the mesh tape below in the first coat.
• Repeat steps 8 and 9, layering in compound and feathering/blending the edges until the mesh tape is undetectable and a smooth transition exists between the patch and the surrounding wall.
• Prime and paint your completed repair.
Tip: When sanding a large patch on a wall or ceiling, a significant amount of dust will be generated and become airborne, settling out around your home. A simple solution for this is to enclose the work area of your patch with lightweight painter’s plastic, sealing it off from the rest of your home. Be sure to use a proper respirator, goggles, and get plenty of air within your plastic enclosure to ensure safety.
Hardware Store List:
– Drywall joint knife and/or taping knife
– Drywall mud pan
– Joint Compound
– Painter’s Putty (for small repairs)
– Sanding Block w/ medium & fine grit drywall sanding sheets
– Self-Adhesive Mesh Joint Tape (for larger repairs)
– Self-Adhesive Mesh Patch (for medium repairs)
– Drywall Screws
– Drywall Repair Board of proper thickness
– Drywall Hand Saw & Utility Knife
– Drywall Screw Setter Bit
– Painter’s Plastic
– Prime & paint to match existing
– Small wood strips (free scraps at lumber department)
– Respirator
– Goggles/eye protection

