DRYWALL REPAIRMAN
DRYWALL REPAIR VANCOUVER
- WorkSafe BC
- Fully Insured
- Video Testimonials
Quote Form
DRYWALL REPAIRMAN
DRYWALL REPAIR VANCOUVER
- WorkSafe BC
- Fully Insured
- Video Testimonials
Quote Form
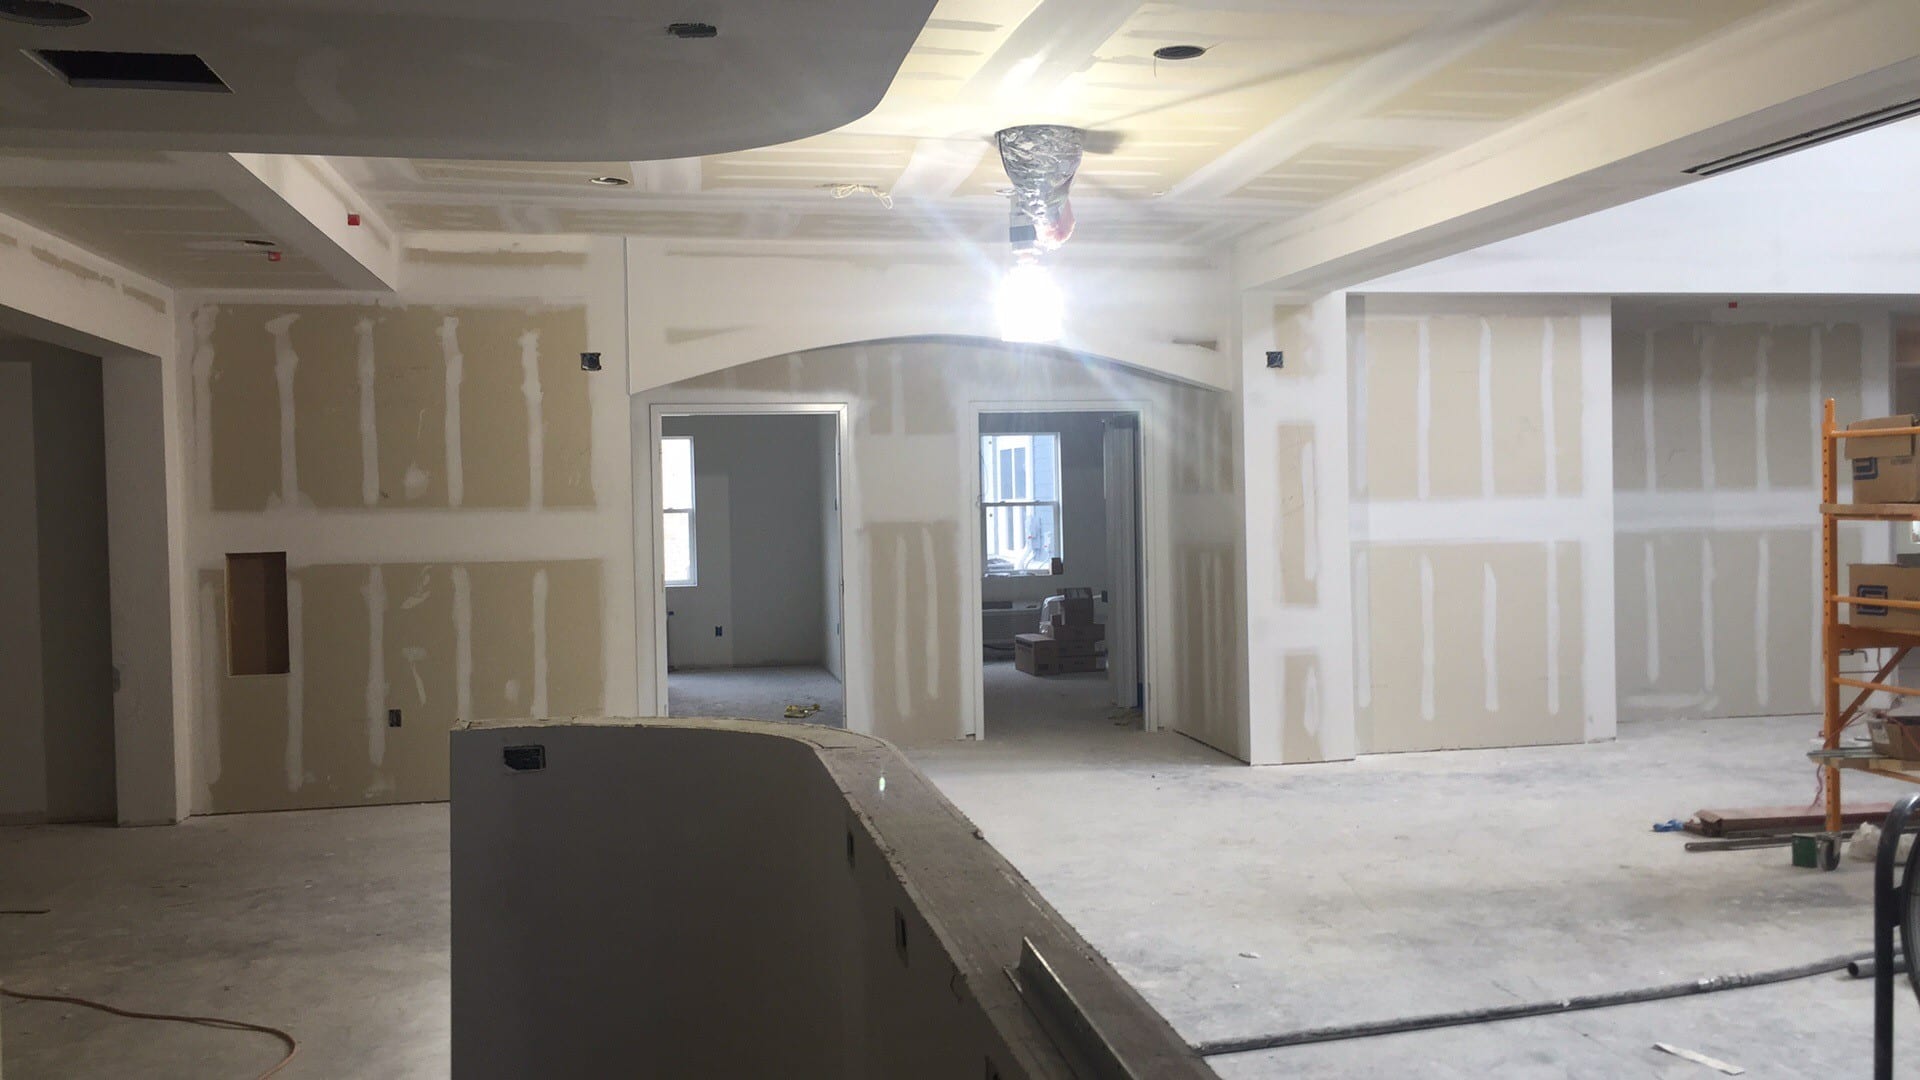
Drywall Repairman Vancouver BC
If you’re looking for a Drywall Repair Professional, then you’re in the right place. We have over 40+ 10 star reviews on Homestars.com and have built a reputation in the lower mainland as the Go-To Professionals for almost every kind of interior home decor repair. Even though we specialize in repair, we have done complete, from the ground up renovations.
When your plumbing has been completely re-done or the electrician has retrofitted your electrical, then it’s time to call us to put everything back together as it was, or better. We will repair textured ceilings seamlessly. Repair walls and install missing trim and finish paint everything as though nothing had happened, we do it all the time.
If your Strata building needs the common areas renovated, then we are the company to call. We have extensive experience in this field.
We are also very sensitive to people’s need to minimize disruption and maximum dust control and we have the protocols for that.
Call or Text us today, or Fill in our Request a Quote form. If you include pictures, measurements and details, then we will do our best to give you a fast quote turnaround.
778-350-6433

Drywall Repair Vancouver
Drywall is one of the most popular materials used in interior finish. It is also known as plasterboard, wallboard and sheetrock.
Drywall is commonly used to create ceilings and walls in homes as well as commercial buildings across Australia. This is because of the numerous benefits it offers.
Drywall is a fairly durable material and allows a great degree of flexibility in finishing.
You can choose from a variety of drywall finish options, from simple to elegant to stand-out unique. Drywall is also easy to install and repair.
That being said, drywall can incur damage fairly quickly. Scuff marks, popping nails, small and large holes, cracks and water-related damage are some of the common problems associated with drywalls.
In this article, we take a look at some of these problems as well as the professional repair options.
You will also find DIY tips in each section to handle some of these problems on your own.
If you have drywall problems that need to be resolved urgently, contact a good drywall company. Vancouver residents can contact us to have their drywall problems identified and sorted in no time.
Ceiling Drywall Repair
Drywall is commonly used to create ceilings. It is a very flexible material which is preferred for its cost-effectiveness and excellent insulation properties.
However, as noted above, drywall is also prone to damage from various elements. Following is a rundown of some of the most common problems with drywall ceilings as well as the professional approach to repairing them.
Water-related Drywall Damage
Problem
Exposure to water can quickly damage a drywall ceiling. A tiny leak somewhere near the ceiling or a plumbing failure can cause this. If left unattended, the damage will grow exponentially over a very brief time. This is why it is important to bring in the professionals as soon as you detect such a problem with your drywall ceiling.
Solution
A drywall repair professional will first identify the damage and work back from it to identify the source of the water leak. He will then take care of the leak first. With that done, the drywall ceiling will be repaired to restore its structural strength as well as its finish.


Drywall Ceiling Cracks
Problem
Cracks develop in a drywall ceiling when your house shifts or settles even a little over time. Homeowners often see them around the edges of drywall ceilings where the stress is the highest.
A house’s structure may shift for a variety of reasons including weather-related expansion and contraction of the materials.
Earthquake-related tremors can also move the structure and leave cracks in the drywall.
If the drywall ceiling is applied on top of a wood frame, the wood frame may dry over time. This can also cause the ceiling to develop cracks.
Solution
Drywall ceiling cracks range from small to large. Smaller cracks can be as small as hairline cracks.
Larger cracks are more noticeable and you will need a professional handyman to take care of them.
If a crack appears on your drywall ceiling, the first thing to do is to check the structural integrity of your house. A drywall repair professional does this by determining what caused the cracks in the first place.
The professional then analyses if the drywall ceiling is likely to develop further cracks in the future.
He also repairs the existing cracks and adds finishing to restore the looks of your ceiling.
Drywall Ceiling Bulge
Problem
A common problem with drywall ceilings is that they might bulge. This happens for a variety of reasons. Drywall ceilings may bulge because: the drywall panels used in the ceiling are too thin; there is too much weight on the drywall ceiling from the insulation material; exposure to humidity has caused the ceiling to gain weight and sag; or the vapour barrier on the ceiling is not properly installed.
Solution
The first thing to do is to identify the cause of the bulge. If the bulge is because the studs are coming undone, you can resolve the problem by adding more screws in a secure way. If the bulge is because of the moisture, you will need to dehumidify the ceiling. In case the panels are too thin, you may need to have them replaced entirely with thicker panels.
If the bulge has already bent or cracked the drywall panel, you will need the help of a professional to have the damaged portion replaced.
Useful DIY tips
-
Use spray applications to take care of hairline cracks in the ceiling. Spray applications are highly effective in the case of smaller cracks. Make sure to apply the spray evenly as most spray applications can’t be sanded. Once the spray coating is dry, prime and paint on it.
-
Replace damaged areas. This is most effective in the case of water-related ceiling damage. To replace the damaged area, cut out the affected portion. Add a wooden support frame and install the replacement.


Textured Ceiling Repair
A textured drywall ceiling can add style to any interior space. Popular textures used in creating drywall ceilings include stipple ceilings, knockdown ceilings and popcorn ceilings.
As with other drywall ceilings, textured ceilings can also develop their own set of problems over time. These range from minor to major. You can handle the smaller problems on your own with the help of the DIY tips at the end of this section.
If your textured ceiling has a more significant damage, however, you will need professional help. The cost to repair textured ceiling at your home will depend on the extent of the damage.
Following are some of the common problems associated with different varieties of textured drywall ceilings.
Stipple Ceiling Repair
The stipple texture is a popular drywall ceiling finish. It is characterised by intermittent raised points lining the drywall. Common problems associated with stipple ceilings include water stains, damage from water leaks, and holes.
If you see water stains on your stipple ceiling, the first thing to do is to identify the cause of the stain. The same applies to water leaks. Finding the source of the stains or the leaks is important before you perform any actual repairs. Even if you hire a professional, you must first ask to have the cause identified.
Once you know what is causing the leaks and have that problem sorted, it is time to deal with the ceiling. If the stain is not too large and there is little damage to the ceiling, you can actually prime and paint it. It will not perfectly match the rest of the ceiling but it will still look a lot better.
If there is significant damage to the ceiling such as in the case of water leaks or holes, your best bet is to replace the damaged portion. Cut a square piece of the damaged portion. Try not to damage the vapour barrier underneath. Put backer boards in place and then install a replacement patch.
When applying a replacement, make sure the texture matches the stipple ceiling. Repairs performed in this way will need diligent attention. A mismatch of the texture can leave a patch that stands out on the ceiling and doesn’t look good at all.
When the patch is in place, spray water on and around it. Tape, sand and spray the area to match the rest of the ceiling.
Knockdown Ceiling Repair
A knockdown ceiling texture is another popular drywall finish used in ceilings across Australia. The iconic knockdown texture is achieved by first applying an even coating and then dragging a knife blade across the coating. This creates a unique and consistent texture across the ceiling.
One of the major problems with a knockdown ceiling is that it can be quite hard to match its texture. Any given knockdown ceiling has a unique texture. If it runs into any damage and you need to have it replaced, it can be hard to have the exact texture recreated for the replacement patch. This is why you will need the services of a professional if your knockdown ceiling has incurred any damage.
If damage occurs to a knockdown ceiling, you will need to have the damaged portion replaced as with other drywall ceilings. To do this, cut out a square patch of the damaged portion. You will need professional help to have a matching patch as a replacement. The drywall repair cost in this case is quite low and very little time is required to perform the repair.
Before you apply this matching patch, use a piece of pine or another wood as the backing support for the replacement patch. Screw the nails into this piece of wood when applying the patch. Make sure the piece of woods extends a few inches beyond the size of the patch on both sides, to serve as a stable support.
Popcorn Ceiling Repair
Popcorn ceilings are a drywall ceiling texture that was particularly popular in the previous decades. Many modern homes still feature these ceilings, although new homes increasingly utilise other textures.
Damage to a popcorn ceiling can range from small to large. Smaller types of damage can be a result of accidentally scraping the ceiling with a ladder or any other equipment. More significant damage can be a result of water leaks, humidity in the drywall panels, or an improperly installed vapour barrier.
As with the knockdown ceilings, a challenge with popcorn ceiling repair is finding the matching texture pattern. If you choose to do this on your own, practice recreating the texture on a spare piece of plywood before you achieve it on the actual replacement patch.
When applying the replacement patch, make sure to sand the surrounding area. This helps you blend in the replacement patch more seamlessly and achieve a more consistent finish.


Useful DIY Tips
-
Scrape the ceiling: If you are having problems matching the texture of your ceiling, you can simply scrape it. This will take off any texture on it, leaving it fairly flat. You can then have a new texture recreated on it that perfectly matches the replacement patch.
-
Use a stain-sealing primer: If your textured ceiling has stains but no noticeable damage to the drywall’s structure, you can use a stain-sealing primer to get rid of the stains. Make sure that you let the primer dry before spraying.
-
Practice on a piece of plywood: Recreating a textured ceiling on a replacement patch is a hard job. You don’t want to apply a patch that doesn’t exactly match the ceiling. To achieve the right texture, practice on a plywood one or more times.
-
Work backwards from the ceiling damage: Make sure to identify the source of the damage before you actually start the repair.
Tips to recreate drywall patterns
-
Use a manual texture sprayer. Use joint compound mixed with water and adjust the consistency to that of thick paint.
-
Spray on a test surface. Adjust the pressure of the sprayer and the nozzle to achieve the desired pattern on the surface.
-
Use a blade and hold it parallel to the known drywall pattern. Then scrape the new patch at the same level to make the patch parallel with the rest of the ceiling or wall.
-
To create a knockdown texture, use a drywall knife.
-
Duplicate the level of thickness as the rest of the drywall. This will ensure a more consistent and even finish.
-
If a ceiling needs extensive repair, you can remove the texture entirely during the repair process. Use a simple scraper to scrape off the texture from the wall or the ceiling. Later, you can consistently apply a new layer of desired texture to the entire surface.


Flood Damage Repair
Natural disasters like floods can significantly damage your property. Floods, in particular, can wreck the drywall used on your property.
If your home has been inundated as a result of floods, you need to consider a few important things as soon as possible:
- Get everything dry as soon as possible. This goes without saying. As soon as the danger is over and you have secured everyone in the house, it is time to start drying the stuff. The sooner you dry the walls, the less will be the extent of damage they incur.
- Mark the level of water on the walls. It is vitally important that you mark exactly how far the walls had been soaked in floodwater. Drywall needs to be replaced once it is wet or soaked. Not only that, water wicks upwards. So even if the wall is soaked for an inch or two, the actual water-related damage extends all the way to 3 to 4 feet.
- Remove the wall yourself. Once you are sure of the extent of damage to your drywall, it is easy enough to have it removed. Mark a straight line to designate a specific height. Then use a utility knife to cut along this line.
- Check the insulation. If the insulation is also damp, it needs to be removed and replaced. Even if the insulation is only a little damp or moist, it is preferable to have it replaced as it doesn’t cost a lot.
- Use airflow to dry behind the studs. After the damaged drywall is removed, put fans in place to dry the studs. This is important before you can proceed to install new drywall panels as a replacement.
If you are not sure how to mark the extent of damage to the drywall or how to remove the damaged drywall and dry the studs, it is time to contact a drywall repair professional.
Drywall repair professionals will take complete stock of the situation and offer comprehensive flood damage repair to all the drywall structures at your home.
They will also replace the damaged drywall panels or repaint them if required.
Useful DIY Tips
- Take safety precautions: It is important to ensure that you have turned off the electrical circuits at your home before handling drywall. Flood may leave drywall and other structural components wet which can pose an electrical hazard.
- Consult an electrician: If you are not sure about the electrical hazards, consult an electrician before you deal with the drywall. This will make sure that you are able to dry, remove or replace the drywall safely.
- Look for mould: Even if you think that you don’t need to remove or replace your drywall after a flood, keep an eye out for mould. Mould growth on drywall can often go undetected and gets worse over time, eventually necessitating a full replacement.
Drywall Repair
If you have recently hired professionals to work on the electrical or plumbing system at your home, your drywall ceilings and walls probably have a lot of holes. This is simply because the wiring or piping done by professionals necessitates drilling or cutting such holes through these structures. And yet, you can’t leave those holes be. These holes can damage the ceilings or walls and mar the aesthetic finish of your home’s interior.
The good news is that having such holes in drywall structures repaired is not all that hard. Whether your drywall walls have small holes or larger openings, these can be repaired and finished to make them look as if they were never there.
The smaller holes can be handled taking a DIY approach. With self-priming filler and a setting compound, you can effectively take care of the smaller holes, nail ridges, dings and dents in the wall.
In case a wall has a lot of holes and dents, use a skim-coat to cover them quickly instead of attending to each one. Even if a wall has a few holes in a row, use a single swipe to cover them. It will be easier to disguise and sand them eventually for a neater finish.
Larger holes are somewhat harder to cover. You can consult a professional to do the job for you. Alternatively, you can do it on your own although it requires a more advanced technique.
To cover a larger hole in the wall, get a square piece of stick-on mesh. You can easily find a drywall metal patch at your local hardware store. Sand the hole a little and then stick the piece of mesh so that it covers the hole completely.
Now apply joint compound on top of the mesh. Use two to three layers of the compound to cover the mesh completely. Using a mesh gives you a more even finish and lets you take care of medium to large holes more quickly.
If a drywall surface has many areas that need to be repaired, you may consider repainting the entire wall. This helps you achieve a more even and neat finish. If you repaint only the patched area, even the most careful coating will not blend in perfectly with the rest of the paint.
When you remove popped nails from a drywall, make sure you add a replacement nail close to the popped nail. This must be done before you repair and finish the surface because the replacement nail will also need to be covered in the repair process.
Useful DIY Tips
-
Use a broad knife when applying the joint compound or the spackle.
-
Use a self-priming filler. This eliminates the need to additionally use a sealing-type primer.
-
To fill in the bigger holes in a drywall ceiling or wall, use a setting compound. Setting compounds harden and dry quickly, letting you wait less between coats. However, a setting compound is harder when dry and more difficult to sand. So make sure to strike off the excess compound before it dries.
-
Use a repair spray to take care of minor cracks. Use an even hand when applying the spray for a neat finish. Apply paint once the spray coating is dry.
-
Take care of any exposed drywall paper. If left untreated, the moisture from the patching material can seep through the exposed paper and cause further damage to the drywall. You can use an oil-based spray-on sealer to close off the exposed area of the paper before applying the patching.
-
When performing any repairs, make sure that the drywall is firmly supported by the studs. If any nails have popped, place alternative nails near it to retain the support of the studs.
-
Take care of the ridges made by popped nails by making a dent over the hole. This lets you fill in the hole later and finish with a smooth surface.
about us
We are a small family-run business in Vancouver BC. We are large enough to do those big jobs, yet small enough to still care. Our attention to detail is what we are known for. We are also known for doing jobs that others will not do. Regardless of the type of project you have, call us: 778-350-6433 and we can come up with a solution to suit you.
3 Convenient Locations
Why Us?

Competitive Prices
Our pricing is transparent and competitive. We do our best to be upfront with all of the costs necessary to do the best work possible.

Warranty
We take pride in our workmanship and are proud to warranty our workmanship.

Over 30 Years Experience
Nothing says commitment like longevity! We are proud of our commitment to our craft and our customers.