Drywal Repair Costs
Whether it is your child playing ball indoors, an aggressive meeting between the doorknob, or just the usual wear and tear of age, drywall chips, holes, and cracks are all common issues in the majority of homes. Luckily for the majority of homeowners, however, fixing these little bruises and bumps is essentially not as hard as it might seem, and your damage might not even require a proper drywall patching kit. In fact, a basic repair can take only an hour or two of actual work and costs only a few bucks, mostly spent on drywall mesh tape and compound.
More significant repairs might cost up to $100 for formal repair kits or new drywall sheets, but they usually do not take more than a couple of hours of actual work to complete, making it a useful and excellent DIY skill for you to have. Also, understanding the ins and outs of repair is crucial when you are hiring a professional for larger jobs as well. This way, you can plan your budget and time accordingly, as it is easy to anticipate costs and other factors.

SAFETY FIRST
Safety is among the most crucial aspects of drywall repair. Not only are there numerous dangers associated with the supplies themselves, but any time you are working on or in the walls of your house, you run the threat of encountering infrastructure systems like plumbing pipes and electrical wires. Thus, it is vital to ensure you (or a licensed plumber and electrician) trace the following before starting the drywall repair project:
• Studs – The repair becomes more complex if a patch needs to go over a stud. Before you cut into what lies beneath the drywall, use a stud finder to be sure what it is.
• Pipes and Wire – Never cut into a wall before first checking for wires. You can consult or hire a professional or even check your home’s blueprints for this info.
When working with drywall and drywall supplies, always keep safety in mind. Note that for 1/2-inch drywall, large pieces are heavy and can weigh around 1.7 pounds per square foot. Ensure that the area where you place the sheet is safe, and keep small children and pets away from the work area until the task is totally done.
Finally, when you are sanding down a wall, always remember to wear safety goggles and masks. Drywall dust contains silica and gypsum particles, which can lead to respiratory irritation when inhaled. Use a drop cloth to trap dirt. After you complete the job, make sure to vacuum with a high-powered workshop vacuum to get rid of all particles.
Small Drywall Fixes
If it’s your first time trying to fix drywall, starting with minor fixes is a great way to get used to the actions of the drywall compound and the procedure for applying it effectively and evenly. However, though simple in theory, an inferior job is pretty easy to complete but leaves your space looking flimsy and cheap. To begin, ensure you have all the basic small-patch and materials and tools:
• Sandpaper
• Utility knife
• 6- and 12-inch taping knives
• Painter’s putty
• Drywall joint compound
Also, note that every type of drywall repair may entail additional materials precise to the repair steps. They are listed below under the appropriate type of repair.

How to Repair a Hole in Drywall
Though still quite simple, when compared to smaller repairs, patching holes in drywall is a bit more of a complex process. This is because the holes need added support. Therefore, to complete these repairs, you will need additional tools. They include:
• Carpenter’s knife
• 120-grit sandpaper
• Putty knife
• Drywall scraps (1/2-inch thick)
• Drywall tape
• Wire mesh
• Scissors
• Pencil
• Tape measure or angle
• Drywall saw
Each hole size requires different work and requirements to patch and, as the volumes increase, so too does the skill level required. Sometimes, a bigger hole of more than 7 inches in diameter, or one that spreads to or across wall studs, is better fixed by a professional.
1. Repairing Small Holes
Minor holes of up to 4 inches in diameter are genuinely the easiest ones to repair with a drywall patch kit. The drywall patch kit provides all the materials you required to get the job done. However, if you need to repair multiple holes, you can alternatively purchase each element separately and use the kit as a guide. These kits contain a strengthened center mesh panel enclosed with self-sticking drywall tape.
Also, you can use a roll of drywall tape and an old window screen to create your own patch. After securing the patch to the wall, using a crisscross method, simply coat over it with tinny layers of the compound and quill the edges. Allow the compound to dry for about one day between coats and sand it to a smooth appearance.
Alternative Method
Materials: For this method, you will require a spackle or joint compound.
• Remove any loose drywall debris and clean the hole.
• Use a carpenter’s knife to put a beveled edge around the border of the hole if it is bigger than a dime.
• Wipe off any dust using a damp rag.
• Use a putty knife to seal the hole with joint compound or spackle, and then slander the filler to make it level with the wall.
• Allow it to air-dry.
• With sandpaper, lightly sand the area and apply an additional coat. Sand once dry.
• Paint and Prime over the filled hole.
2. Repairing Medium Holes
Medium-sized holes that are up to 4-6 inches in diameter but do not extend to the wall studs are more challenging to fix, but they still only need some basic techniques skills. They need a more substantial reinforcement than mesh provides since these holes are more massive. Most of the time, you can still handle the job with a simple patch. Instead of mesh, the California Patch technique uses scrap 1/2-inch drywall to act as a patch. Here is how to fix a medium-size hole in drywall:
1. Measure the hole size and cut out a piece of drywall that is roughly 2 inches taller and 2 inches longer than the hole itself.
2. Using a boxcutter, groove the back of the drywall piece so that there is an extra 1-inch border around the square. Leaving the paper layer intact, snap off the gypsum at that scoreline.
3. Utilizing the drywall piece as a stencil, put it against the wall so that it seals the hole, and trace along the boundaries of the square.
4. Fit the patch inside by using the drywall saw to cut the hole.
5. With a tinny layer of the compound under the paper layer, secure the patch to the wall and press it into the wall.
6. Camouflage the edges using a feathering technique and layer compound over the entire patch. For improved stability on larger patches, you might decide to add a layer of drywall tape round the edges.
7. Wait at least one full day after applications of the compound. Then, to ensure the patch is secure, apply at least two layers.
8. Sand after the last layer is dry.
Method 2
Materials: For this method, you will require a joint compound and a drywall patch.
• Clean and sand the part around the hole where the patch will touch the wall.
• On the side of the patch to the wall, apply the adhesive.
• Using a joint compound, cover the patch.
• Apply the compound using a crisscross pattern and your putty knife.
• Apply sufficient compound to seal the area and have plenty to feather.
• When dry, lightly sand and smear another coat.
• Using a with sandpaper, sand the dry second coat.
• To blend the repair into the wall, feather the edges.
• Prime and paint.
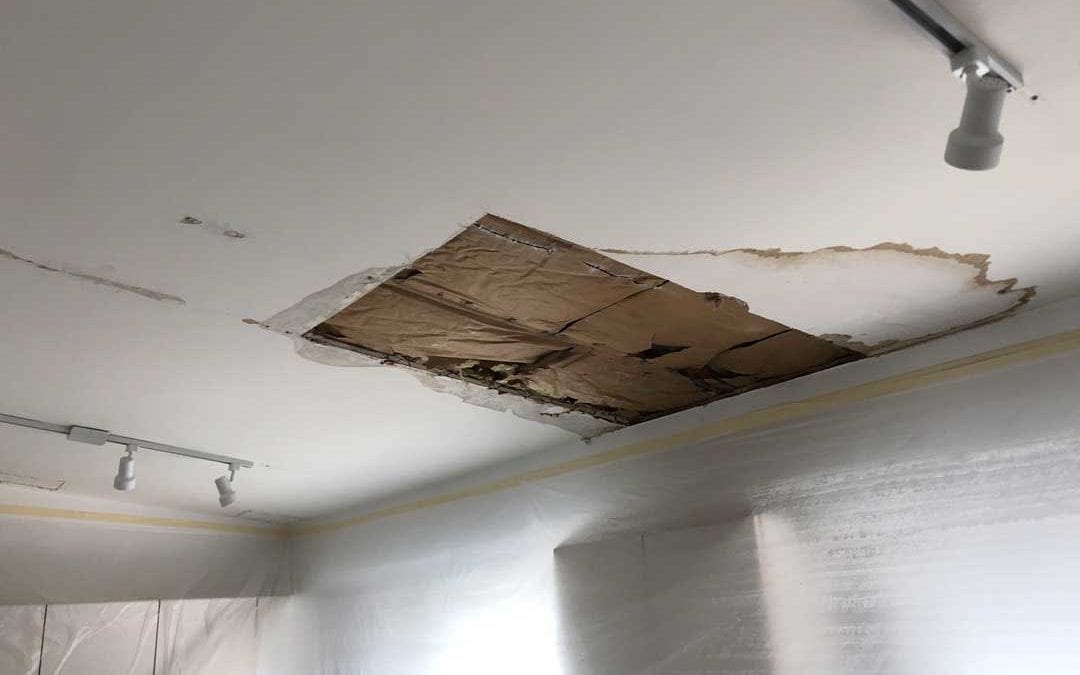
3. Repairing Large Holes
Holes more substantial than 6 inches can’t be appropriately fixed using a patch alone; to hold the drywall patch in place, they need the extra support of wood furring strips. This technique is comprehensibly more challenging and generally best reserved for the advanced and intermediate DIY drywaller. It needs additional materials, including mesh tape, drywall screws, and 2×4 furring strips. The method is as follows:
1. Measure the hole size and cut out a square piece of drywall that is a little larger than the hole, leaving extra space on all sides.
2. Utilizing the patch as a guide, trace around its edges over the exterior of the hole.
3. Cut away the extra material along the stenciled area using the drywall saw.
4. Measure the upright sides of the hole and cut two 2×4-inch furring strips that are about two inches longer than the measurement.
5. Make straight the furring strips on both sides of the hole and drive a drywall screw into the bottom and top of both pieces, carefully to drive each screw into the drywall itself and leaving a small dimple.
6. Again, driving each screw into the surface of the drywall, set the drywall patch into place and safeguard it with 4 screws into the furring strips.
7. Using mesh drywall tape, tape around the borders of the patch.
8. Using with joint compound, cover the whole patch adding more into the feathering edges and dimples of the screws.
9. After a day of applying coats, apply more until the surface of the compound is uniform with the standing wall.
10. Sand the final coat smooth.
Method 2
Materials: For this method, you will require a joint compound, drywall screws, joint tape, furring strips, and a scrap piece of drywall.
• Cut out a four-sided piece of new drywall that is somewhat larger than the hole.
• Place this piece on top of the section that requires to be patched, and using a pencil trace around it.
• Along your trace lines, use a drywall saw to cut out the damaged area of drywall.
• Put the furring strips over the hole. Anchor them from the front with drywall screws and pull them tight against the behind of the drywall.
• Ensure the screws tightly hold the furring strips to the backside of the drywall. The screw heads must be even or a little dimpled.
• Set the new drywall patch in position, and using drywall screws, secure it to the furring strips.
• By bedding in drywall tape with joint compound along the boundaries, hold everything together.
• Cover the whole thing using a drywall joint compound.
• Once dry, lightly sand and apply an additional coat.
• Once it dries, sand the additional coat.
• Prime and paint.
Tips for Repairing Holes in Drywall
• After the 2nd layer has been sanded, apply a 3rd layer of joint compound for a smoother appearance.
• To have material to feather, for patches, spread the joint compound over a broader area than the patch.
• When sanding joint compound, wear a dust mask or have somebody capture dust with a vacuum.
• Use a can of wall texture spray before you paint if you are repairing textured drywall.
• In a pinch, use a durable paint stirring stick instead of a furring strip.
• Never skip the preparation step – joint compound can’t be painted on top of dirty drywall. Some spackles might have primer previously in them. These are only suitable for small holes.
• Since small holes are more comfortable to fix, any hole larger than a nickel should be fixed with the instructions under the large or medium hole.
• If you are using a joint compound, purchase it pre-mixed for minor DIY jobs. As it dries, spackle may shrink in larger holes and may need an additional application. The joint compound might bulge or run out as it sets and will necessitate a second application and sanding.
Warning
• Inopportune application of large drywall sheets might lead to disfiguration and cracking of the wall over time.
How to Repair a Crack in Your Drywall
A crack in your house wall is not necessarily a cause for panic. Cracks are mostly caused by factors other than problems with the house foundation. The reasons include changes in humidity and temperature, high or frequent winds, natural settling of the house, as well as ongoing ground shaking in earthquake-prone areas. While a contractor should determine the reasons for large or numerous cracks, generally those over 3 to 4-inch-wide, you can fix the smaller ones yourself with inexpensive supplies and tools and basic DIY skills. Things you will need include:
• Paintbrush
• Paint
• 120-grit sandpaper
• Drywall tape
• Putty knife, 6 inches
• All-purpose joint compound
• Hammer or electric drill
• Drywall nails or screws
• Screwdriver
• Utility knife
• Ruler
• Pencil
To repair drywall cracks, follow these quick and simple steps:
Step 1
On each side of the crack, draw a pencil-line approximately 1/8 inch from the boundaries of the crack.
Step 2
Using a utility knife, on one side of the crack, cut along the pencil-line. Cut to the deepness of the crack. On the other side of the crack, repeat the cut on the pencil-line.
Step 3
Utilizing the utility knife, clean out the crack as much as possible. Then, using a screwdriver scrape out the crack, cleaning out any movable material.
Step 4
On each side of the crack, push on the drywall. Make a pencil marking where the drywall moves.
Step 5
Drive a drywall screw or hammer a drywall nail into the area of the drywall marked with a pencil. Ensure to hit wood on the backside of the drywall. Drive more holes, as needed, even if they are situated away from the crack. They can be touched up and filled in later. To stop the patch from breaking loose, make the drywall as steady as possible.
Step 6
Mix all-purpose joint compound with water until it smoothens like the uniformity of toothpaste or pudding.
Step 7
On the front edge of a 6-inch-wide putty knife, put a golf-ball-size scoop of the compound. Over the crack, spread a coating of joint compound, roughly 1/8-inch-thick. Filling it completely, push the compound into the crack. Spread the compound over a range roughly 6 inches wide with the crack in the middle.
Step 8
Put the drywall tape over the crack, ensuring the crease in the middle of the tape is lined up with the center of the crack and faces the wall. To cover the length of the crack, apply as many pieces of tape (one layer thick) as needed.
Step 9
Begin at one end of the tape and tug the putty knife towards the center. To force joint compound out from under it, push down hard on the tape. Air bubbles left beneath the tape cause it to swell later. When necessary, eliminate the tape from an area where the joint compound refuses to discharge out, apply more tape and compound, and repeat the procedure. Continue by insertion the putty knife, full with a scoop of the compound at the other side of the crack while pulling it up from there to the center.
Step 10
To make the surface of the wall is as smooth as possible, feather the drywall compound away from the crack.
Step 11
Wait one day for the compound to stick and with 120-grit sandpaper, sand the drywall compound smooth. The compound should match with the current finish on both sides of the crack.
Step 12
Over the repaired area, apply a coat of paint. Allow it to sit for a full day and apply a 2nd coat of paint.
Tips
• By driving the screw or nailhead barely below the surface, patch the drywall where it is necessary to drive screws or nails into it away from the crack. With drywall compound, cover the screw or nailhead and smooth it with the putty knife, so it is level with the exterior of the drywall. Keep the fixed area as minor as possible. After it sets for 24 hours, sand and paint over the fixed area and smear a second coat after another 24 hours.
• Ready-to-use all-purpose drywall is accessible at home improvement stores.
• With a pole extension sanding pad, sand ceiling cracks.
• Seal the remaining drywall compound firmly and use it later.
Warnings
• The normal movement of the wall causes the crack to break open later. So, make the drywall on both sides of the crack as steady as possible.
• When working on areas above your head, wear safety goggles.
• When sanding vast areas on a wall or areas above your head, wear a respiratory mask.
How to Repair Drywall Corner Bead
Regularly, constructors secure the external corner bead of a wall with metal or plastic to reinforce and make the area damage resistant. However, a stout knock can still lead the outer drywall to crack, or chip, and a more powerful shock can even dent or bend that corner bead. Depending on the damage sustained, there are different repair options.
For chipped or cracked corners, follow the techniques outlined for patching cracks or dents, smearing more than one thin coat of compound as needed, and make sure to cover both sides of the corner.
In the case that the bead is destroyed, it is required to cut away the damaged area and replace it with a new one. To do this, you need extra materials and tools which include:
• Metal snips
• Pry bar or claw hammer
• New corner bead
• Metal-cutting saw
Start the repair process by cutting away the corner bead part below and above where the damage to the drywall happened. You may need to peer part of the corner bead of the drywall sheets depending on the size of the segment. Once done, measure and use the metal snips to cut a new piece of corner bead and attach it using some joint compound on the bottom. Once it is attached to the wall, apply an extra 3 layers of the compound on top of the new corner area to merge it back into the wall and cover it.
How to Repair Loose Drywall Tape
Loose drywall tape can cause small horizontal or vertical layers to open up in your wall, producing unappealing cracks that let moisture where it does not belong. Luckily, repairing peeling drywall tape is only a little harder than a typical patching job. If you only have a slight tear, strengthen the tape beneath by patching over it before it gets out of control. For more noticeable or more prolonged peels, remove the section of tape and replace it with a new portion of mesh tape prior to patching it. Things you will require include:
• Sanding block with fine sandpaper
• 10-inch drywall knife
• Drywall tape
• Drywall compound
• Putty knife
• Utility knife
• Drywall sanding screen
• Drop cloths
To fix loose drywall tape, follow these quick and simple steps:
Step 1
Eliminate any furnishings and any other objects from the floor surrounding the work area, and remove any wall hangings and pictures nearby. Using a with a drop cloth, cover the floor underneath the damaged area.
Step 2
Using a drywall sanding screen, lightly sand the area with the spoiled drywall tape. With a utility knife, make a 1/8-inch deep cut around the border of the damaged tape. Then, take the putty knife peel away from the spoiled tape and drywall compound. Moderately scrape the area to be fixed to lift and get rid of any additional loose materials.
Step 3
In the area to be repaired, smear a light coat of premixed drywall compound, adding sufficient compound to work beyond the boundaries of the tape by a couple of inches in both directions. Get a small piece of tape and place it in location over the drywall compound and seam. Before proceeding, allow this compound to dry completely.
Step 4
Adding about two inches of width in every direction, cover the tape with another thin layer of compound. To scrape away any excess joint compound, gently slide a 10-inch drywall knife across the whole joint. Before proceeding, allow this layer to dry totally.
Step 5
Add a 3rd layer of compound feathering another 2 inches in both directions, then lightly scrape off any high points. Allow this layer to dry completely, then review the joint to see if a fourth or fifth additional layer is necessary. If so, add more and feather new layers until the joint is level and smooth.
Step 6
To give the area a final smoothing, go over the part with a sanding block of very good sandpaper (220-grit or higher). With the repair complete, sand any high points until it is smooth. Add more layers of joint compound and repeat if any low points are evident.
Tip
• Once the repair is completed, you can paint, prime, and texture to match the surrounding wall.
Warning
• A dust mask and safety glasses are advised since sanding drywall produces a fine powder that can easily be inhaled.
How to Repair Poped Nails in Drywall
Most common in newer houses, nail pops occur when the nails securing the drywall onto studs pop out of the studs and over the wall. This typically occurs as a consequence of warped wood which might not have been dry when installed. It is seldom a structural problem and generally only an aesthetic one. But in case you’ve got an abnormally high number of nail pops, or even a lot of nail pops confined to a single place, it could possibly be a fantastic idea to have a specialist come and inspect the construction of your wall prior to attempting a fix. For this particular fix, you will also require a drive-in extra drywall screw. There are two approaches to do this repair.
1. Remove the nail and replace it with a new drywall screw
2. Screw or hammer the nail back into place in the stud
Either way, once done, you need to mount the popped nail space using a fresh twist about 1 1/2 inches. Ensure each nail or screw is sunken to the walls, leaving a little dimple, then follow the directions for attaching dings and scratches to finish the fix above the screw heads.
How to Repair, Patch Dings and Dents in Drywall
Whether from moving a random flying object or a large piece of furniture, dents and dings in drywall are some of the easiest and fastest repairs to finish. Using a utility knife, simply scrape any loose debris or paint out of the region surrounding the hole. Then, patch it up with a joint drywall compound or a dab of painter’s putty and allow it to dry for 24 hours prior to trimming the surface. You might need to repeat the procedure another time if the ding is deep.
How to Clean Drywall Safely
Washing bathroom surfaces, floors, dishes, and many other parts of your house seem like the only everyday maintenance tasks. However, these are not the only places that get dirty in your home. Occasionally, it is essential to wash the walls. Since the walls in the majority of homes are made of drywall, it might be a bit confusing to know precisely how to handle this job. While wallpaper or paint often cover the plain drywall material and assist in protecting it, drywall can still be damaged, and cleaning these types of walls requires to be performed carefully to avoid unnecessary repairs. Things you will require:
• Preferred cleaning solution
• Cellulose sponge
• Feather duster or dry cloth
Washing Drywall
Step 1
Regardless of whether you’ve protected or otherwise painted the drywall, regularly dust it using a dry cloth or a feather duster to keep it free from dirt and dust. Normally, that is the sole kind of cleaning required regularly. Keeping dust off your drywall will enhance its physical appearance and will help keep it in great condition. You may choose to stop here; however, in case your drywall needs extra attention, there are other steps to consider.
Step 2
Get a cellulose sponge. These sponges are generally offered at home improvement stores and a number of different shops that sell cleaning stuff for homes. These sponges are rubbery and consume moderate amounts of fluid. Wringing a moist cellulose sponge must leave it moist enough to use on drywall. Since drywall will absorb excess water, which might lead to damage to the walls, this can be a far more suitable instrument for washing walls compared to some other sponges or moist rags.
Step 3
Prepare your preferred cleansing solution to remove stains or dirt out of your drywall. In case you’ve got an unpainted part of drywall, or you’re planning to paint it immediately, utilize a mix comprising one cup of vinegar with a gallon of water. Kitchen walls, along with other areas where there could be dirt build-up, may necessitate using ammonia. Mix a cup of ammonia to a gallon of water to aid remove the dirt.
Step 4
Soak the cellulose sponge in a suitable solution and wring it out completely. The sponge must just be slightly moist to prevent an excessive amount of water from soaking through the drywall. Wipe the walls along with your moist cellulose sponge in a downward direction. Start at the top of the wall and then wash straight to the ground. This will guarantee that drips of water in the sponge are going to be consumed as you proceed with the wall down. Drops of water on the walls can lead to damage to the drywall material. It should just be moist enough to remain wet for a few minutes.
Conclusion
I hope that was not too scary. The first drywall repair is always the most difficult, and it usually gets better over time. Performing your drywall repairs can save you money, and in hard times it might be the only choice. If it isn’t the only choice and you want perfection, then call an expert.